Cell Ranger6.2, printed on 04/03/2025
To learn how to navigate the Loupe Browser interface, a pre-loaded AML Tutorial dataset is included and used to demonstrate the interactive functionality.
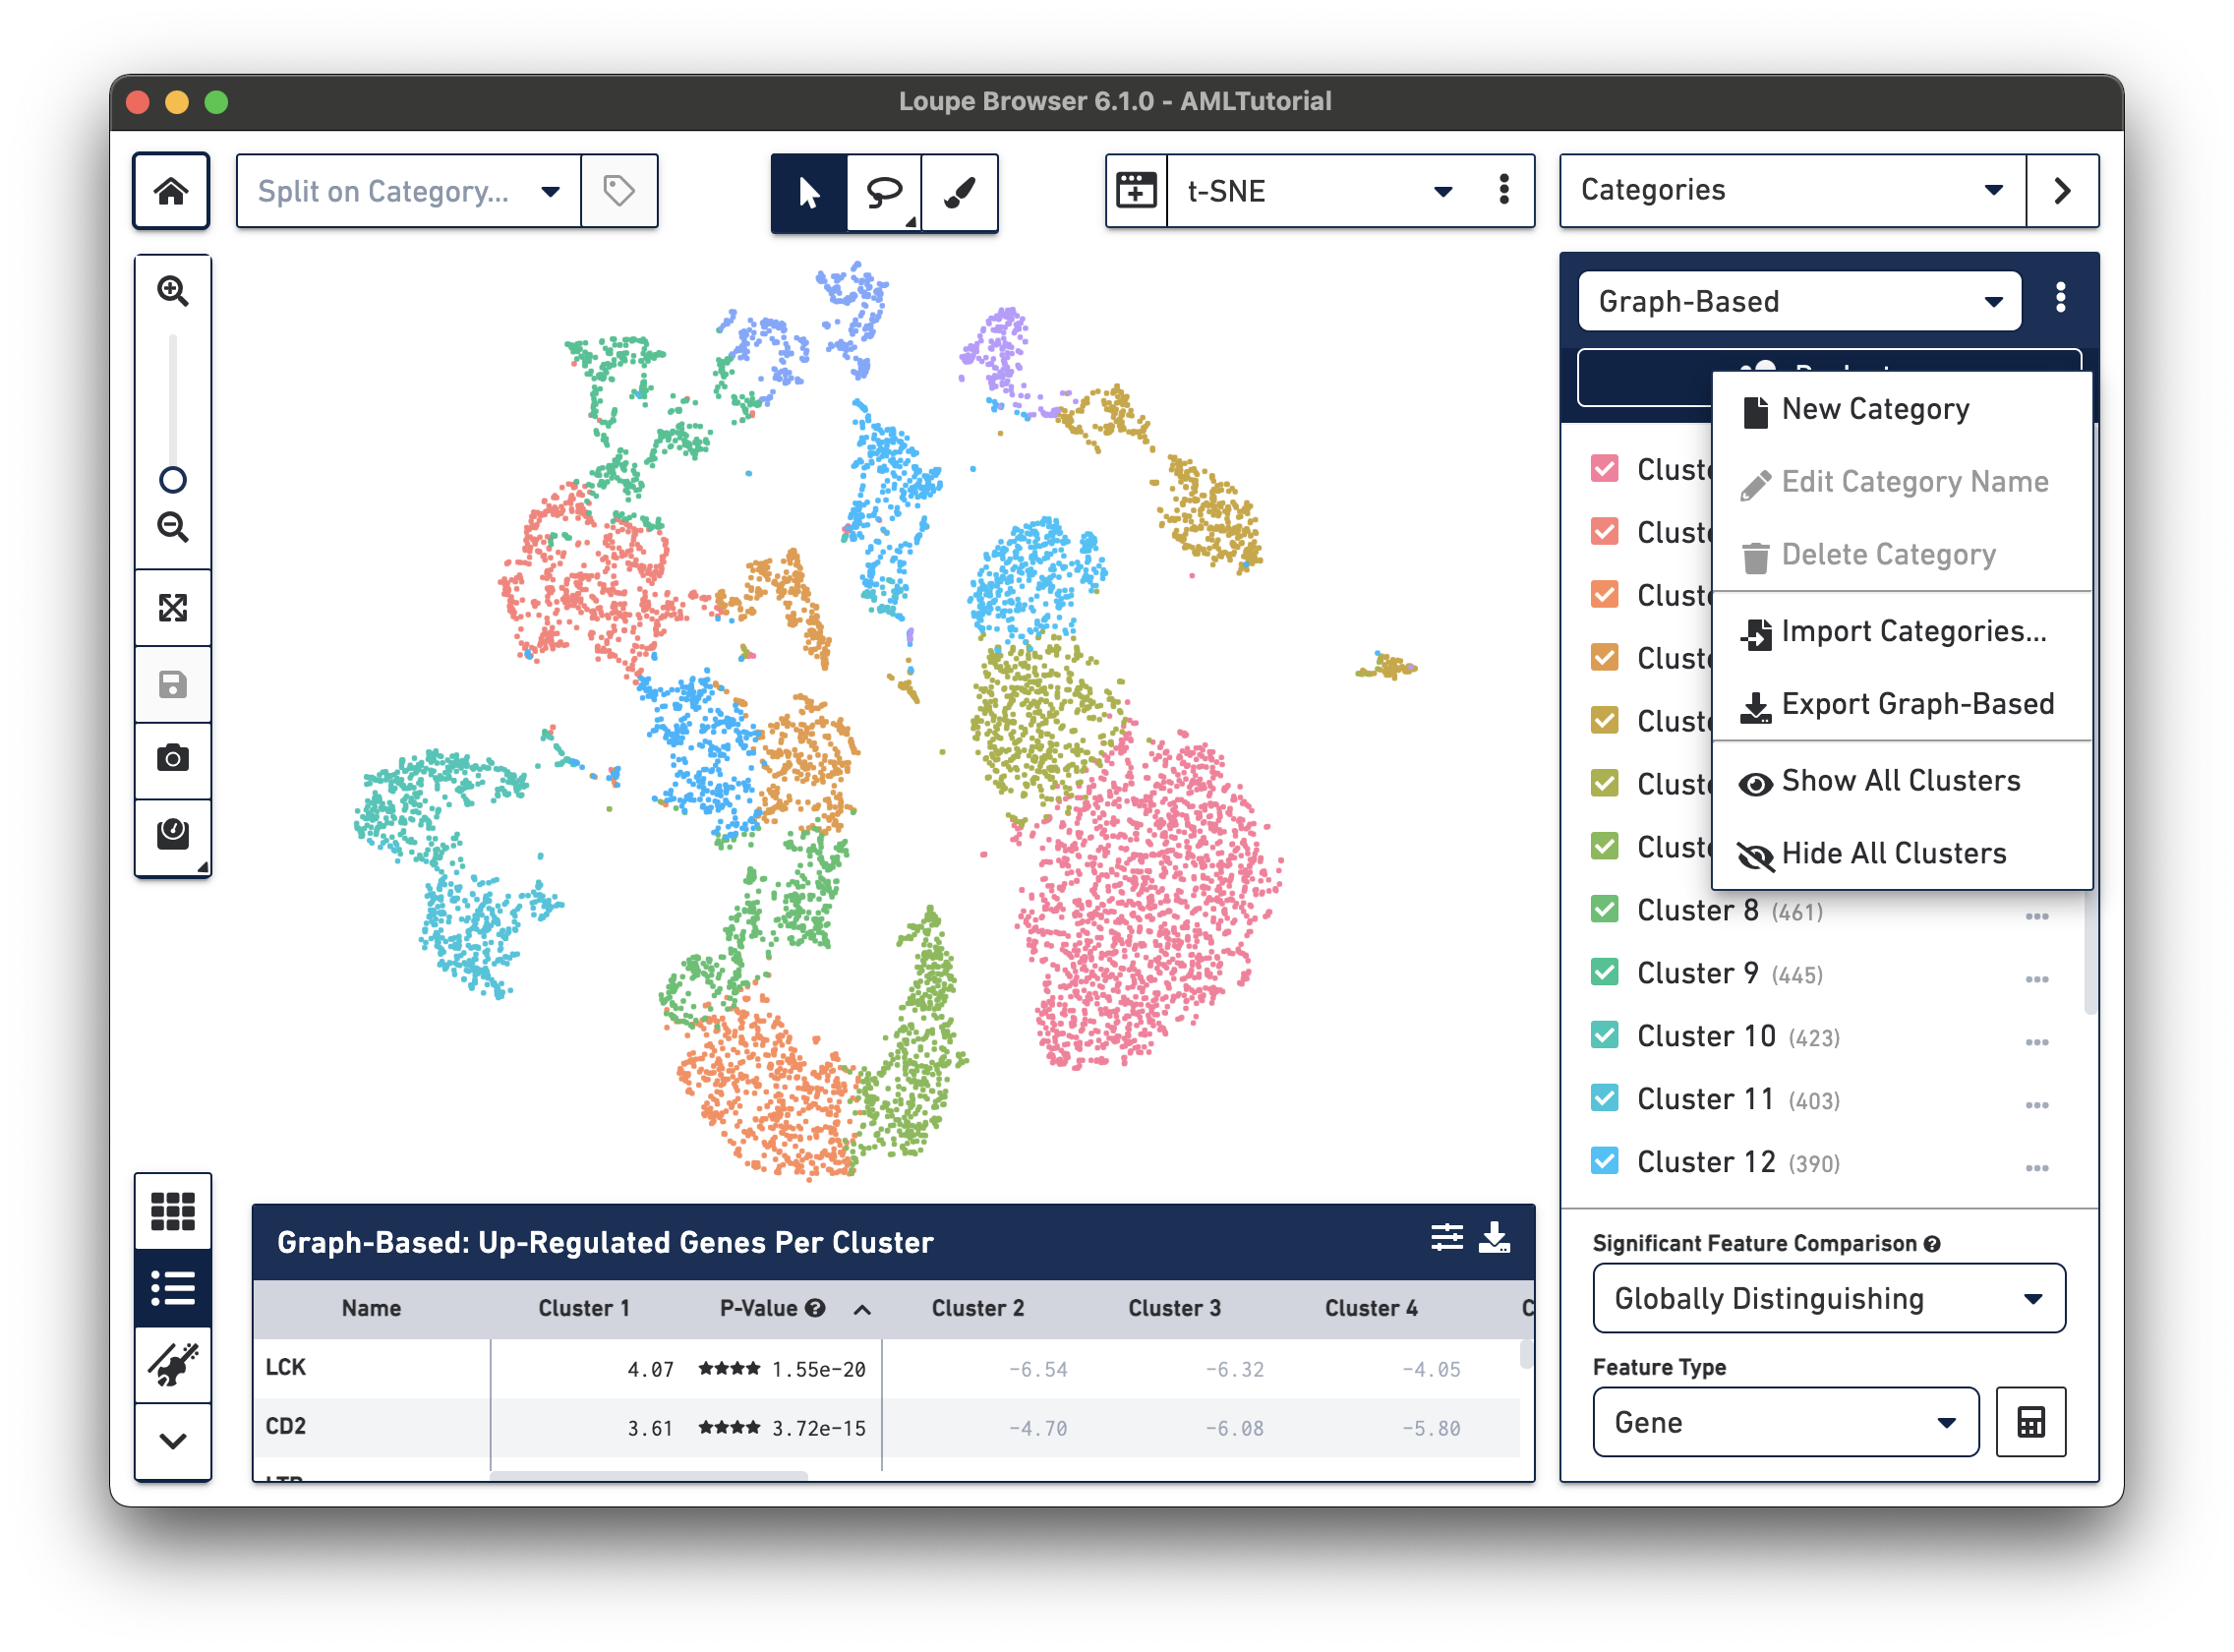
The following image provides an overview of the key components of the Loupe Browser interface. Each of these components are described in more detail below.
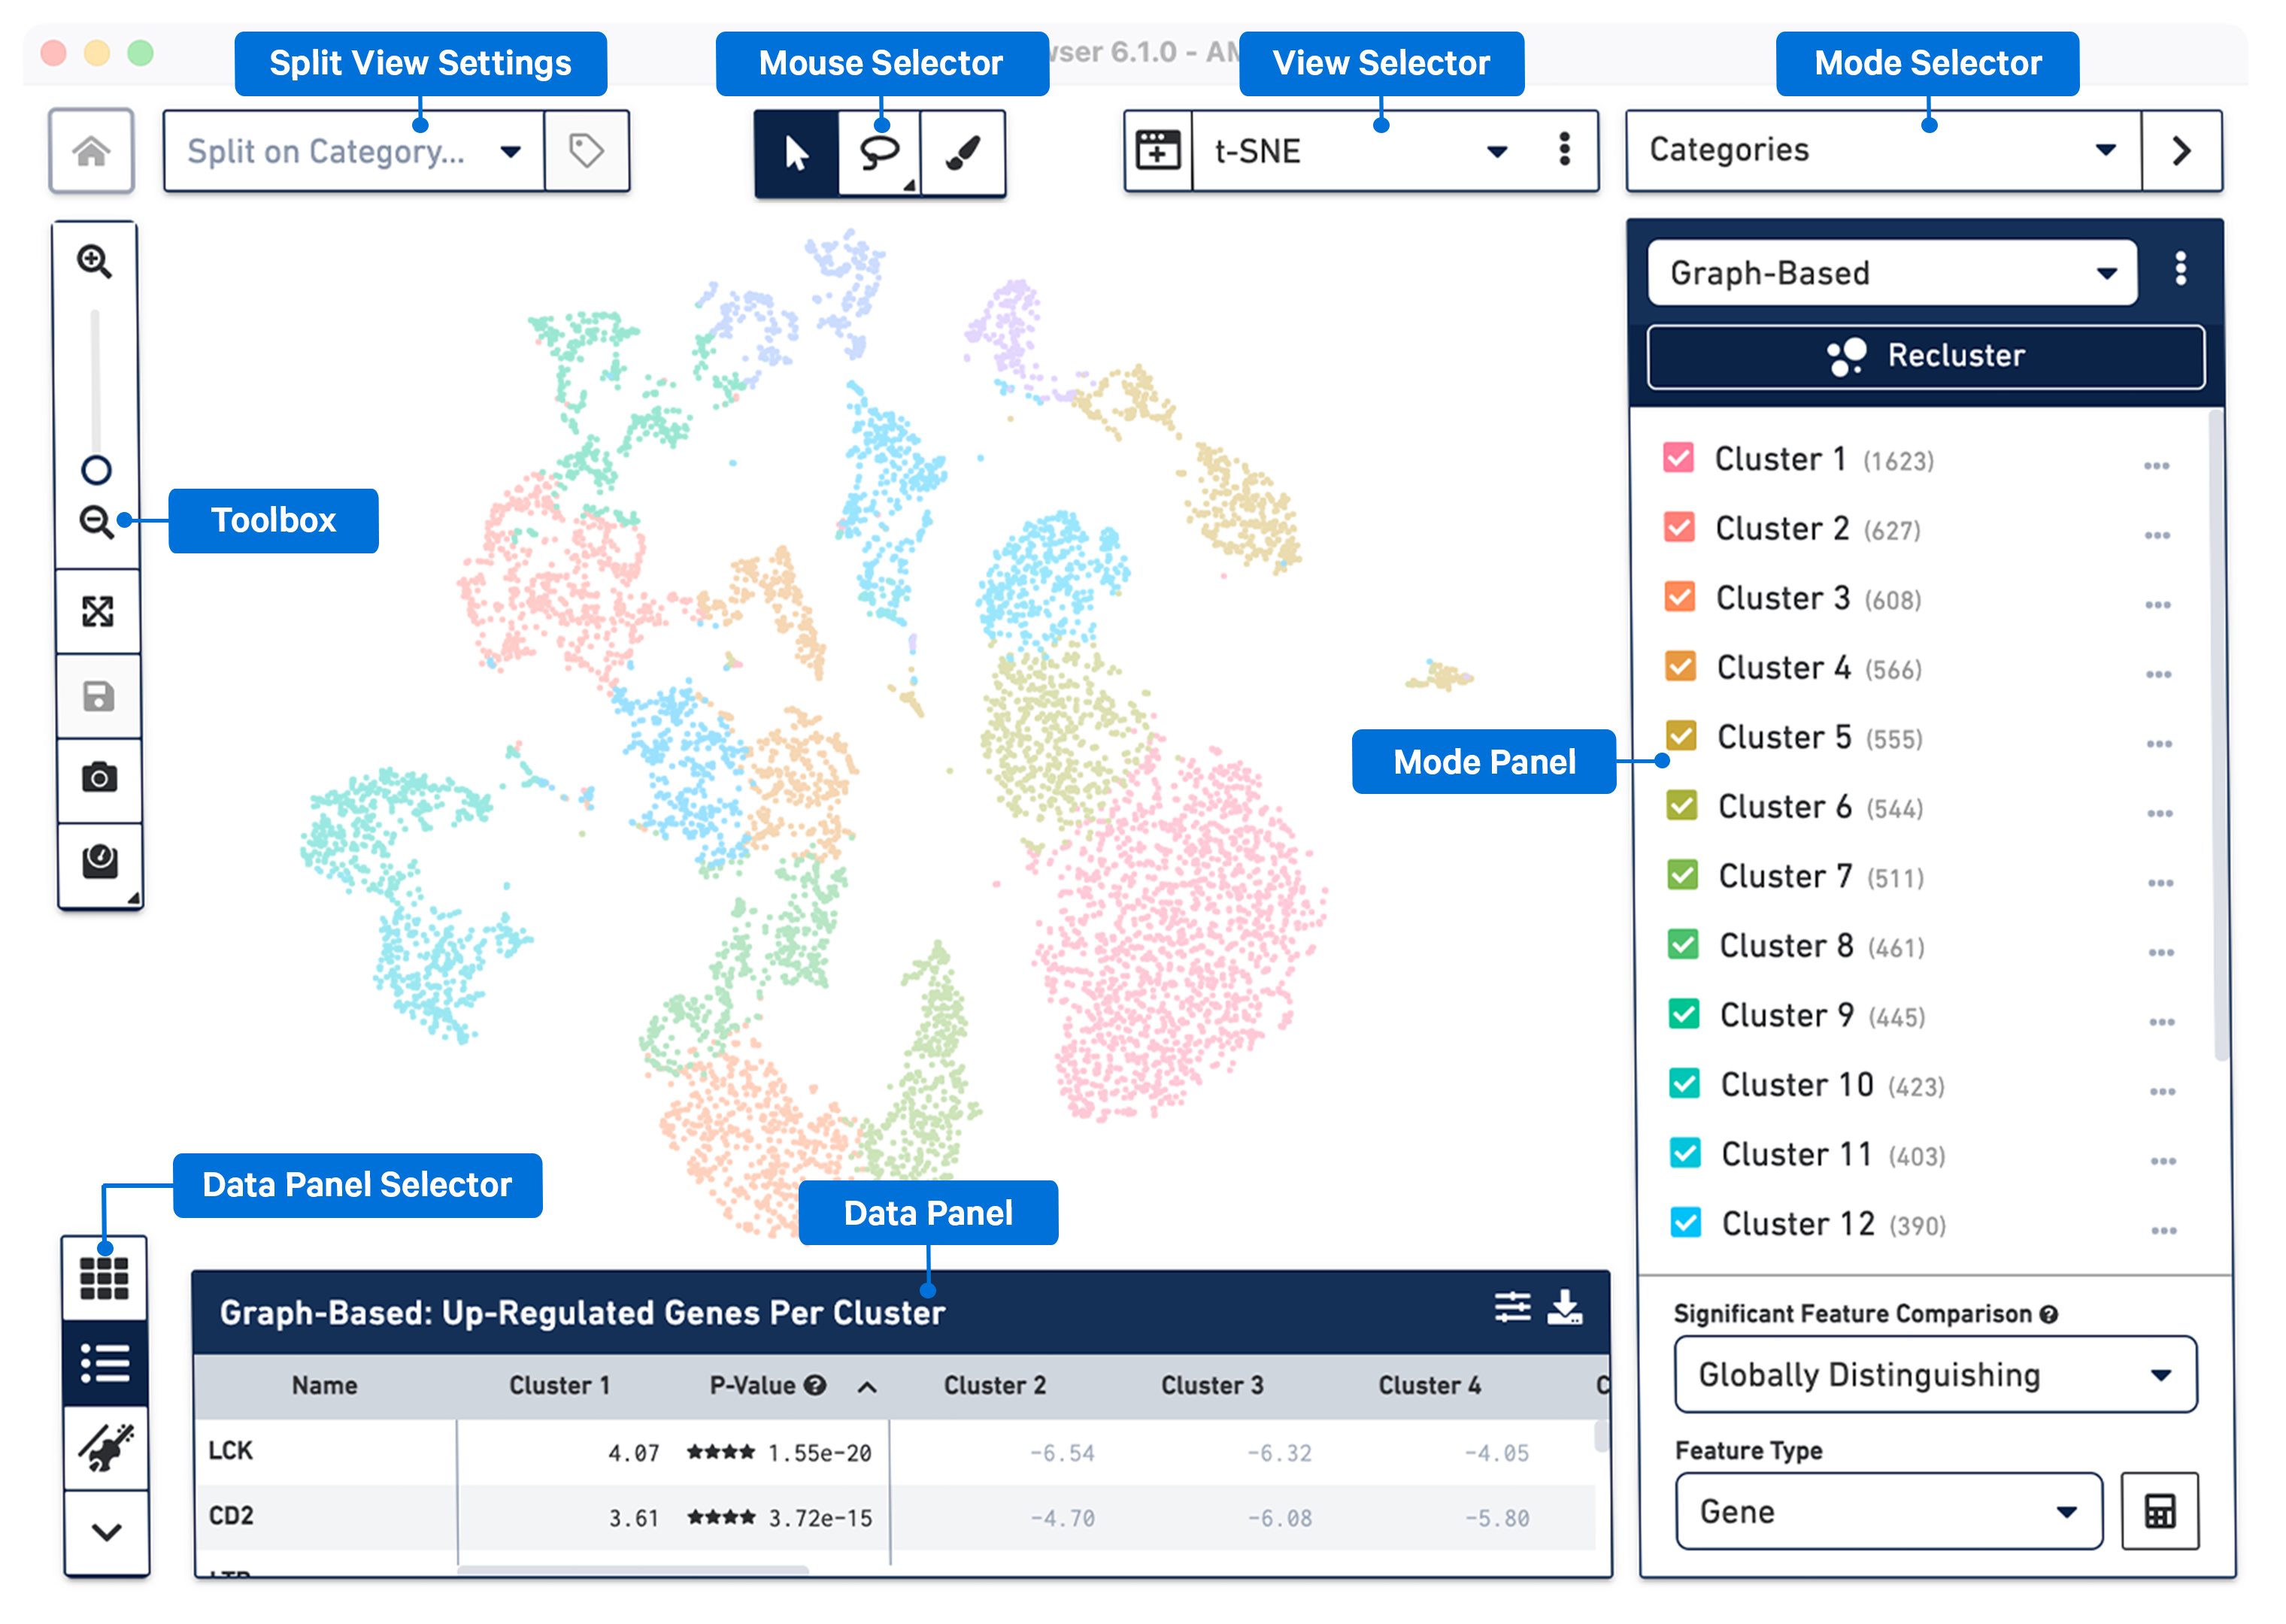
The workspace is centered around the view panel, in which single points representing cell barcodes are shown in a variety of projections. Each point represents a single barcode, the vast majority of which correspond to a single cell. The default projection is the t-SNE plot created by the Cell Ranger pipeline, though other projections are available through the View Selector.
You can drag the mouse over the cells to reposition the plot, and use the mouse wheel or track pad to smoothly zoom in and out. You'll see cluster labels as you move your mouse over the plot, which is useful for data that has a high number of precomputed clusters. Cells are colored by the active legend in the sidebar.
The Mouse Selector has three options from left to right:
| Tool | Description |
|---|---|
| Pan - Move the image up and down, or left and right. | |
| Lasso Selection - Select and label an image area with an irregular shape, or toggle option to select and label a rectangular image area. | |
| Draw Selection - Select and label individual spots using a brush tool. |
The Toolbox is on the left side of the window. Move your mouse over the toolbox icons to see an explanation of what each tool does. The tools in the toolbox perform the functions listed in the table below.
| Tool | Description |
|---|---|
| Zoom In and Zoom Out - Click on + to zoom in, click on - to zoom out, or use the slide bar to zoom in and out. | |
| Autoscale - Reverts to default zoom and position that fits the screen after zooming in or out or moving the image/plot around. | |
Save As - Save changes to the .cloupe file. |
|
| Export Plot - Export the scatter plot (UMAP, t-SNE, Feature Plot) in SVG or PNG format. | |
| Marker Settings - This option can be used with t-SNE, UMAP, and Feature Plot views to scale marker size. Uncheck the Auto-scale box and use the slider to move to desired size. |
To return to the home screen and the Recent Files list, click the home![]() button in the top left corner.
button in the top left corner.
The Data Panel Selector tools are on the bottom left of the window. They are used to change the information located in the Data Panel at the bottom of the window. Move your mouse over the icons to see an explanation of what each tool does. The tools perform the functions listed in the table below.
| Tool | Description |
|---|---|
| Heat Map - Two dimensional representation of the significant features for each cluster. The colors represent the feature log2 fold change. | |
| Feature Table - Lists the top differentially expressed genes across the clusters in a tabular format. | |
| Violin Plots - Hybrid of box plot and kernel density plot across all clusters shown for one or more selected active features. | |
| Hide Bottom Panel - Choose this to minimize the tool options in the Data Panel Selector. |
To expand the viewable area of the data panel, use your cursor to drag the top border of the panel up. Drag it down to reduce the size.
The View Selector controls the current projection in the View Panel. Most gene expression datasets will have the following projections available:
Additional projections may be available from the View Selector, including:
Both t-SNE and UMAP projections are created by versions of Cell Ranger 3.1 and later.
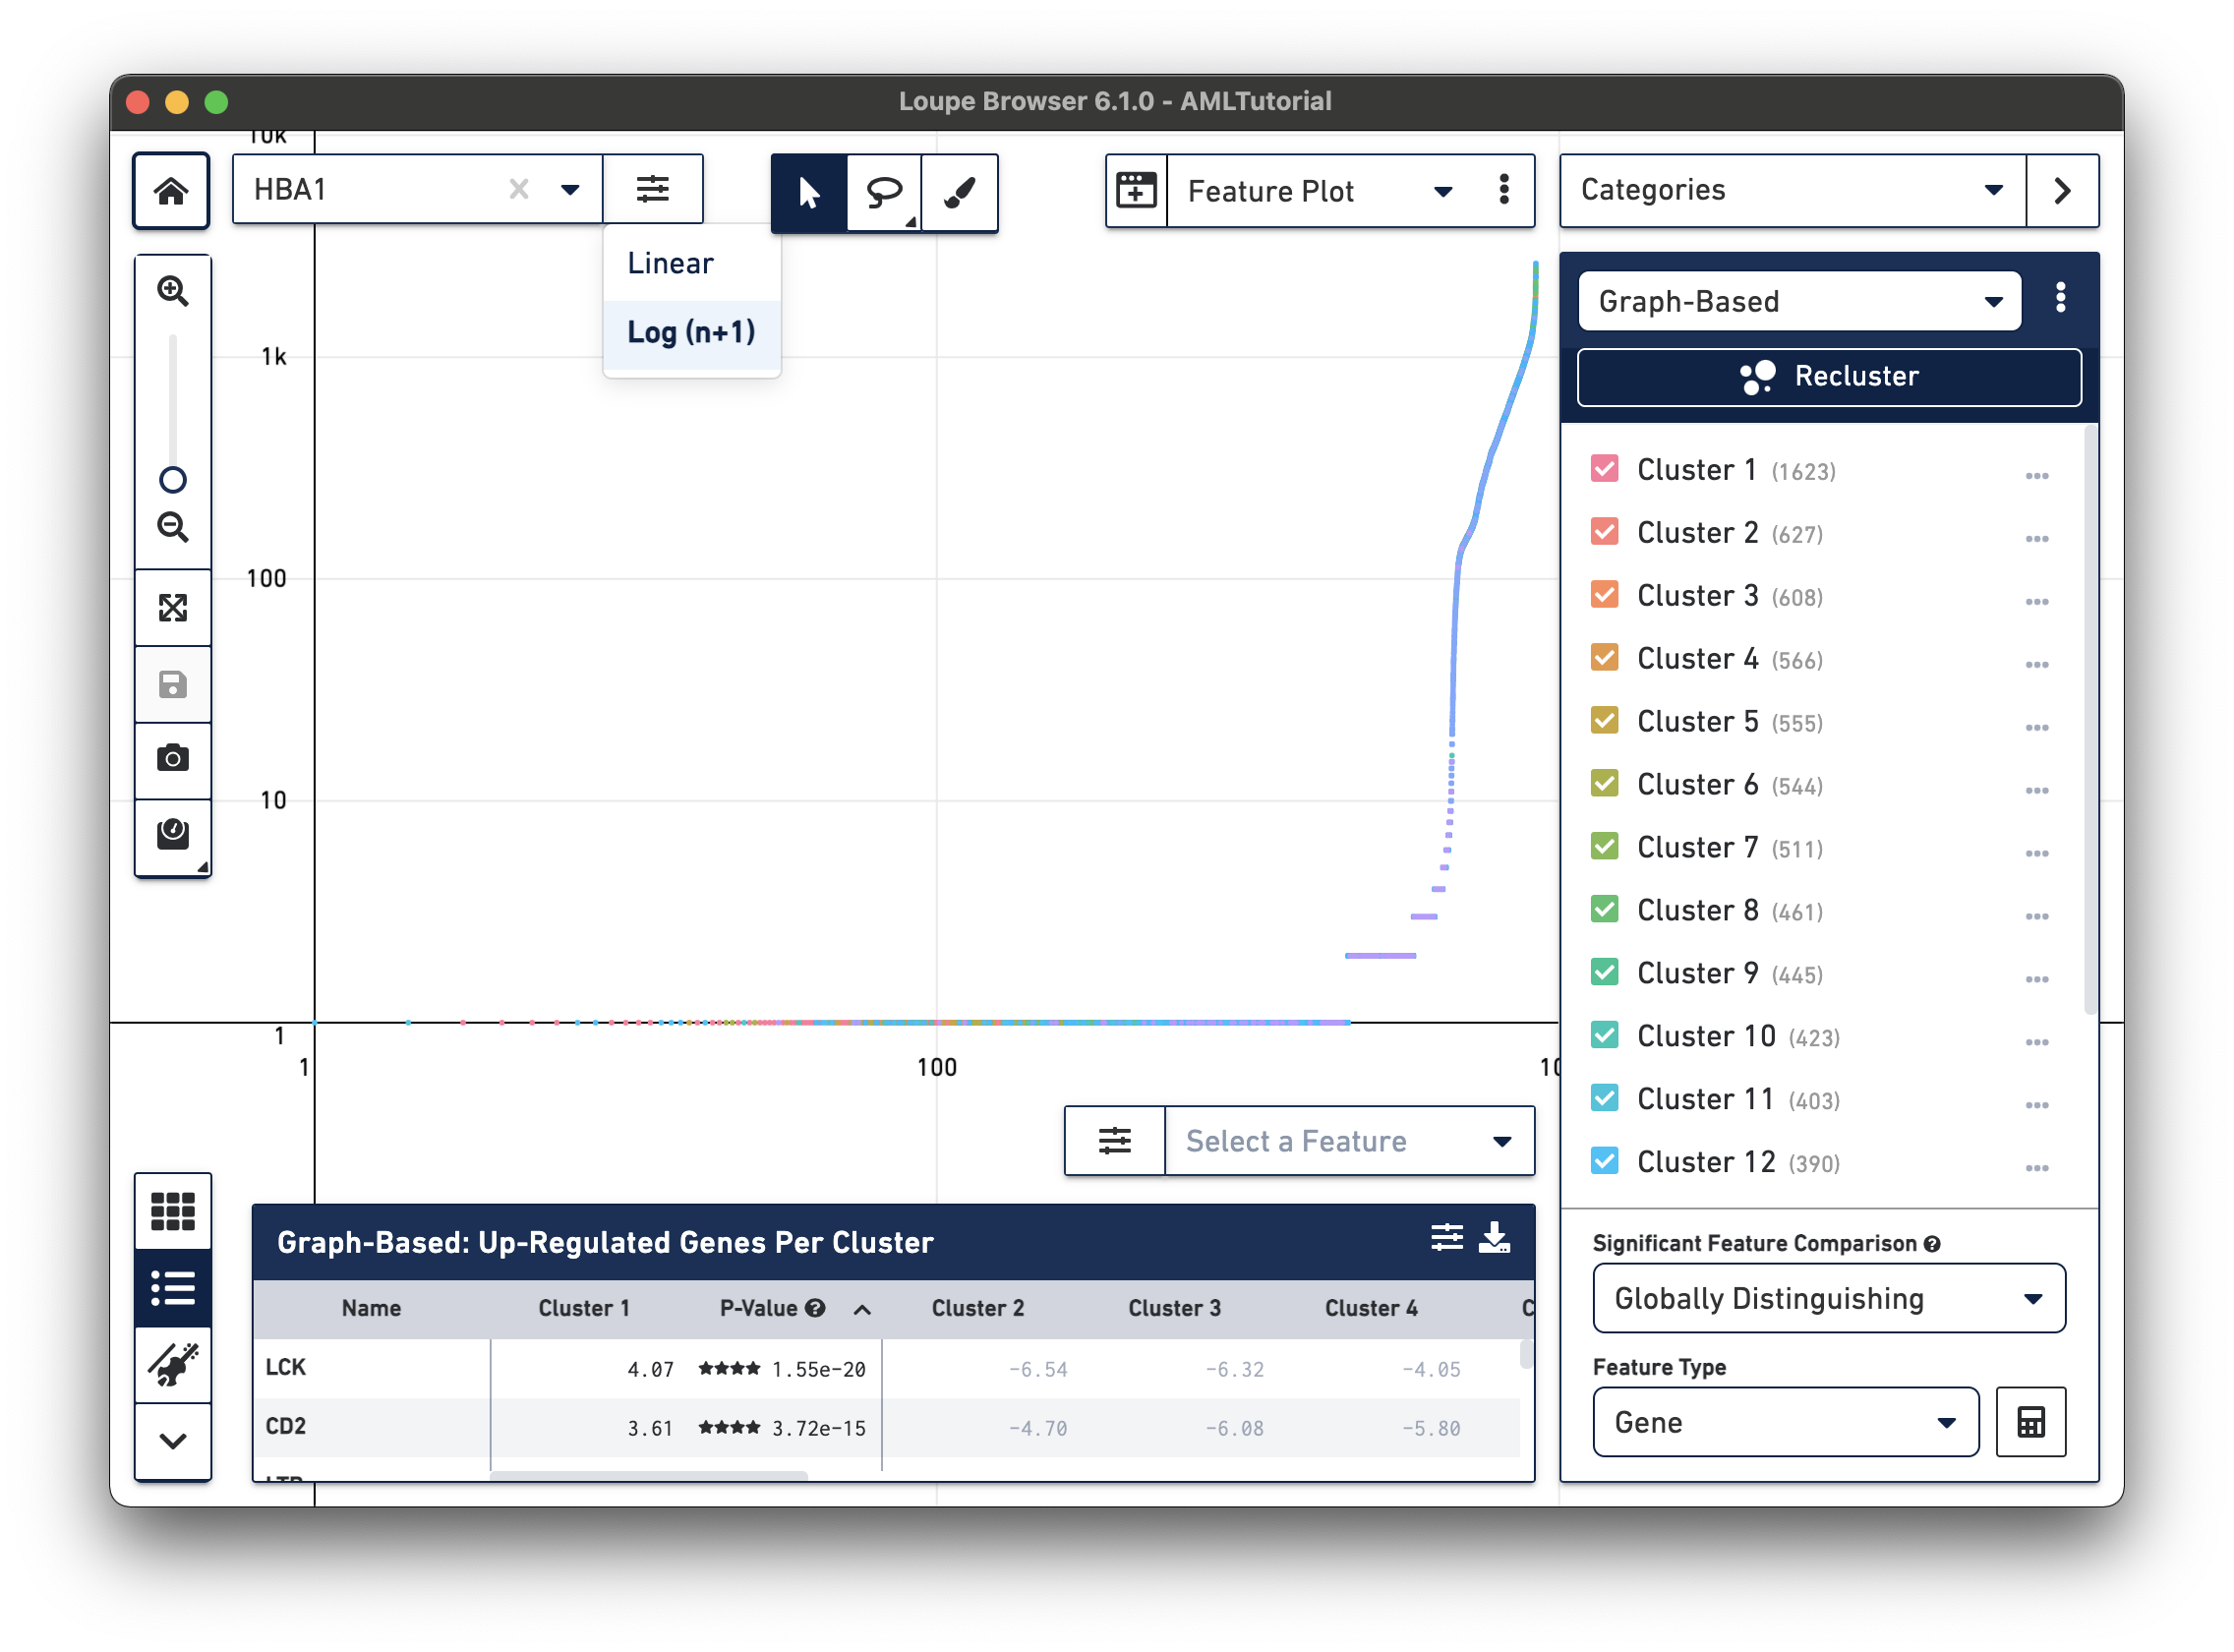
The Feature Plot view allows you to visualize the expression levels of one or two genes for each cell. This view makes it easy to threshold sets of cells based on the level of expression of one or two genes. Features, in this case genes, can be entered in the text box at the top of the Y axis or on the right side of the X axis. These selectors also contain a control to switch the scale of the axis between linear and log scale.
There are many scripts and third-party tools that can be used to generate different projections of the data including but not limited to the following:
If you generate alternate projection coordinates from custom analysis, you can input that projection into Loupe Browser. To do this, click on the three vertical dots in the View Selector to import a CSV file to use a custom projection for a dataset.
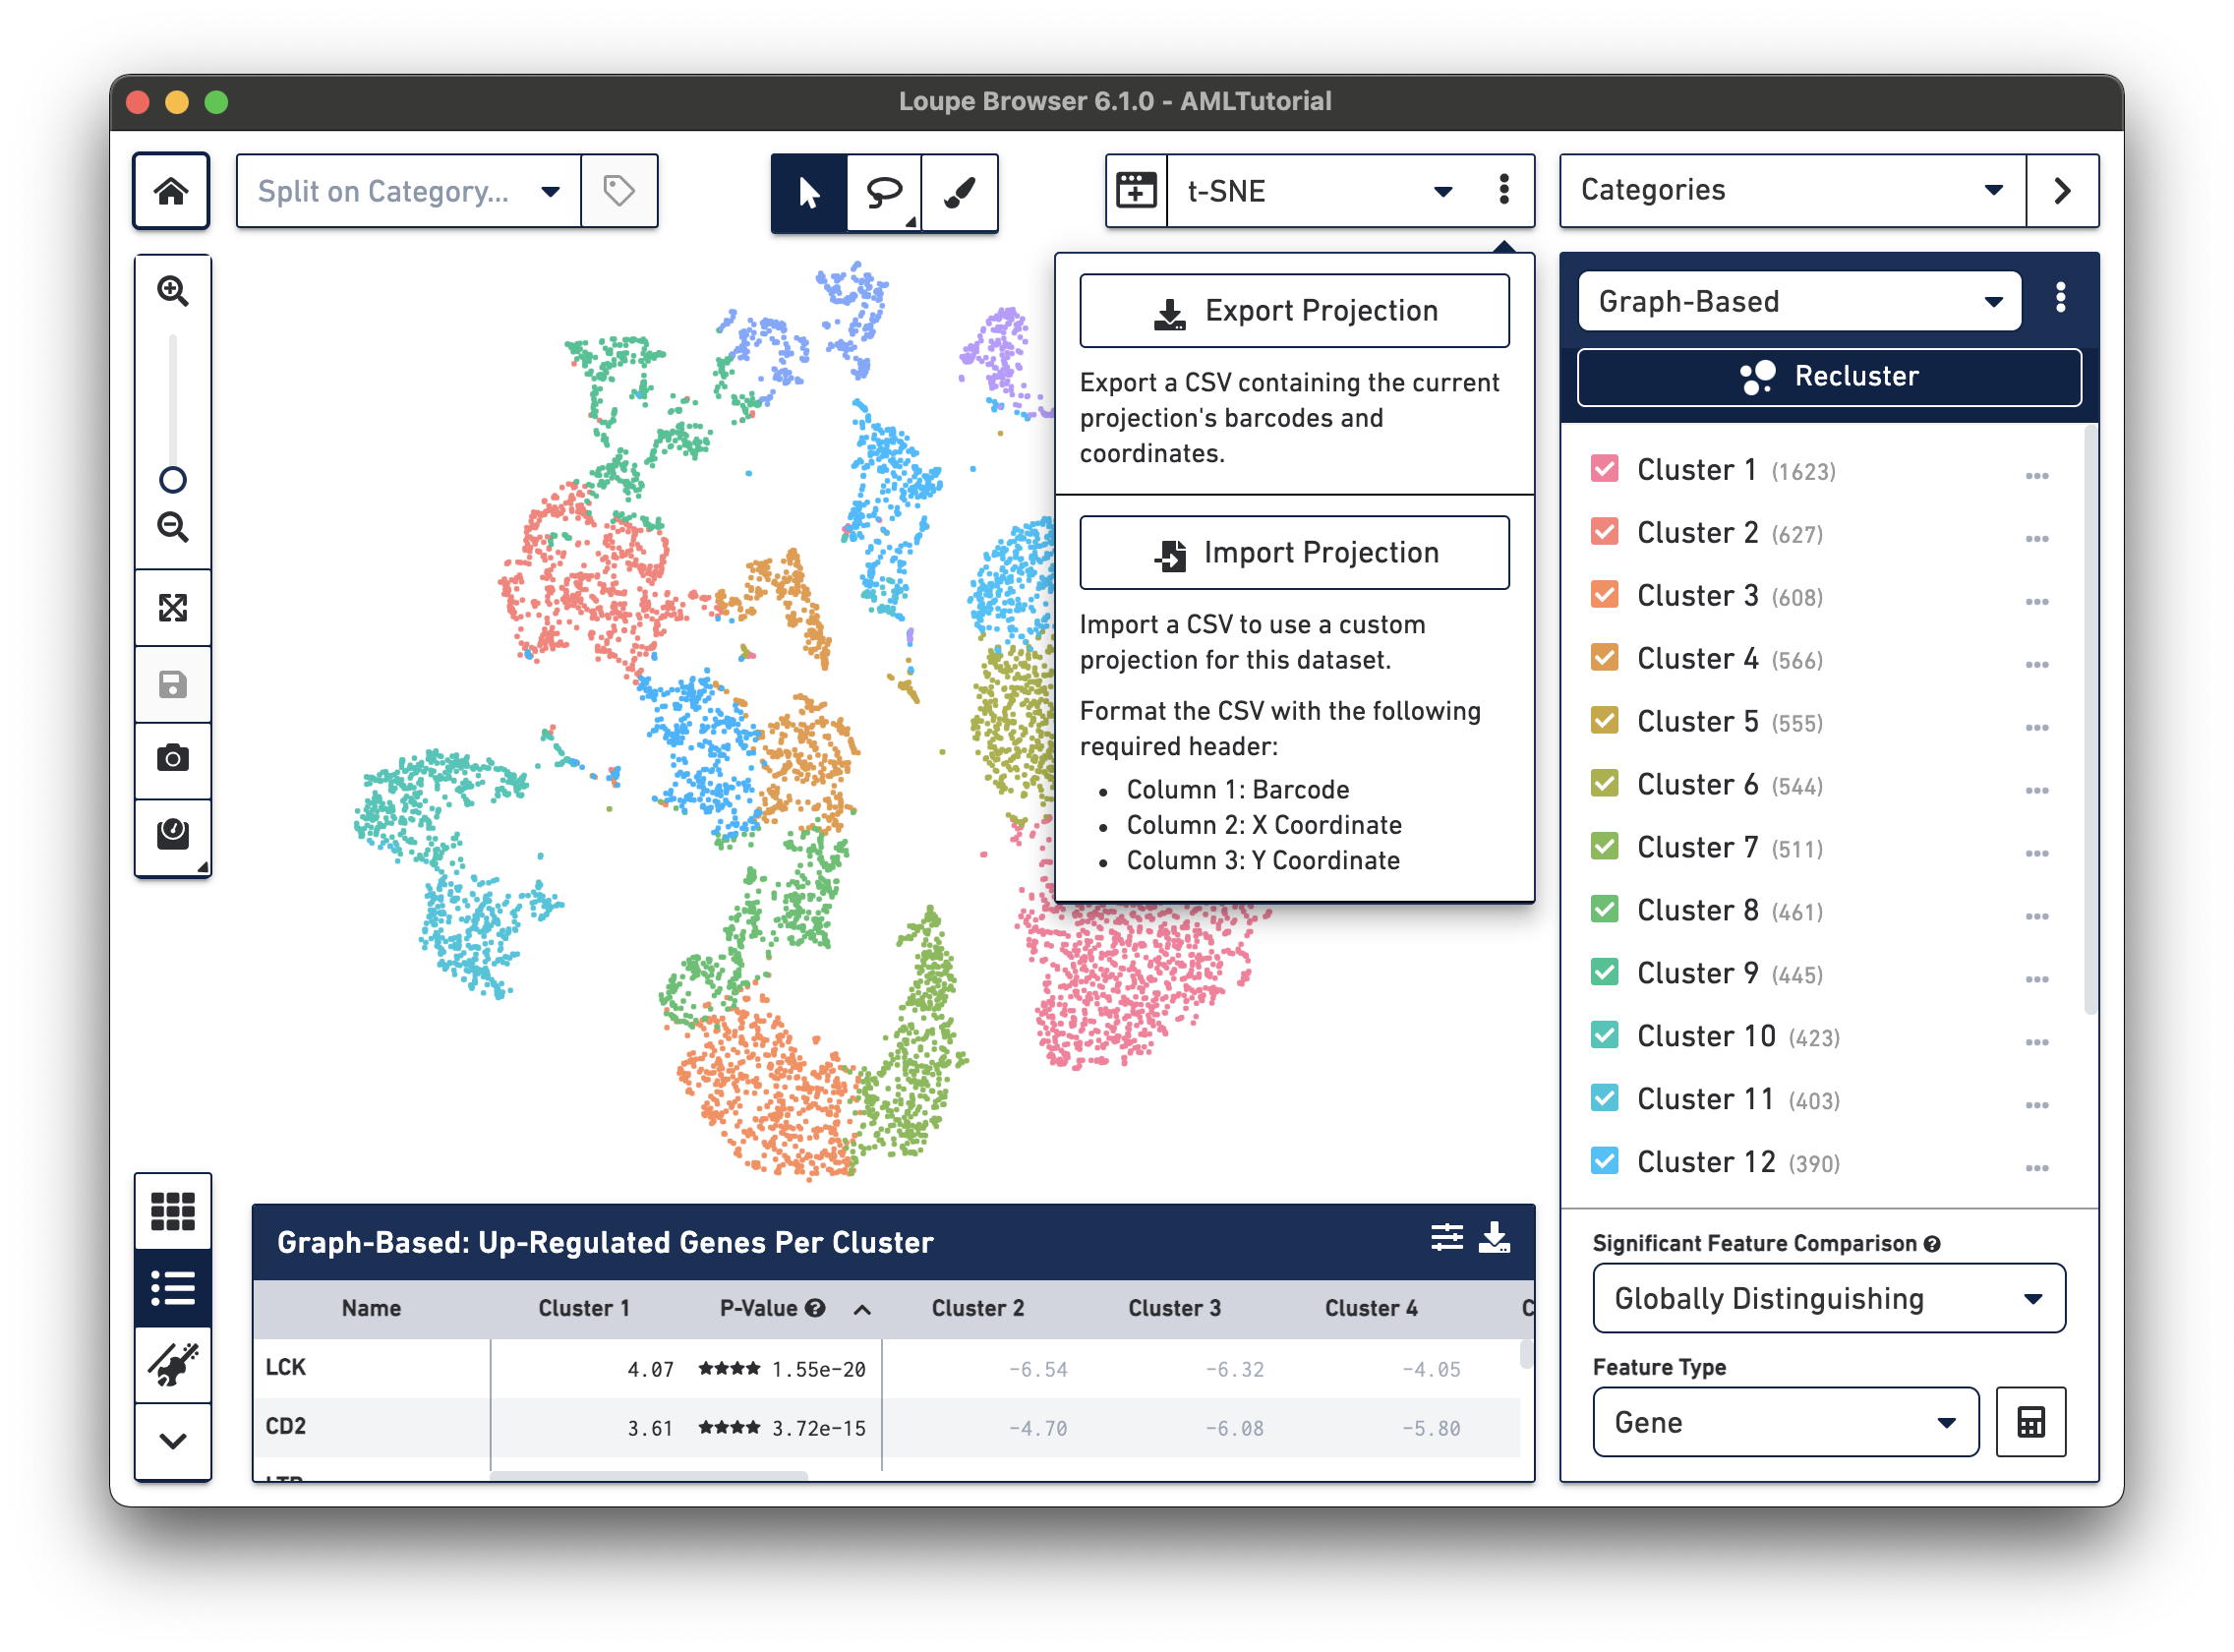
The CSV format for importing projections is as follows:
.cloupe file.To import new projections, click on Import Projection, select the CSV file, and click on Import Projection. Once a custom projection is uploaded, click on Import Projection again to edit the name of the projection, or to delete it.
In Loupe Browser 6.0 and later, you can also export the selected projection t-SNE or UMAP coordinates as a CSV file, including projections generated with the filtering and reclustering wizard.
Use the Mode Selector in the top right corner of the workspace to switch between Loupe Browser's different modes. Switching between modes applies mode-specific coloring to the View Panel, and changes mode-specific functionality to the Mode Panel. There are four modes in Loupe Browser:
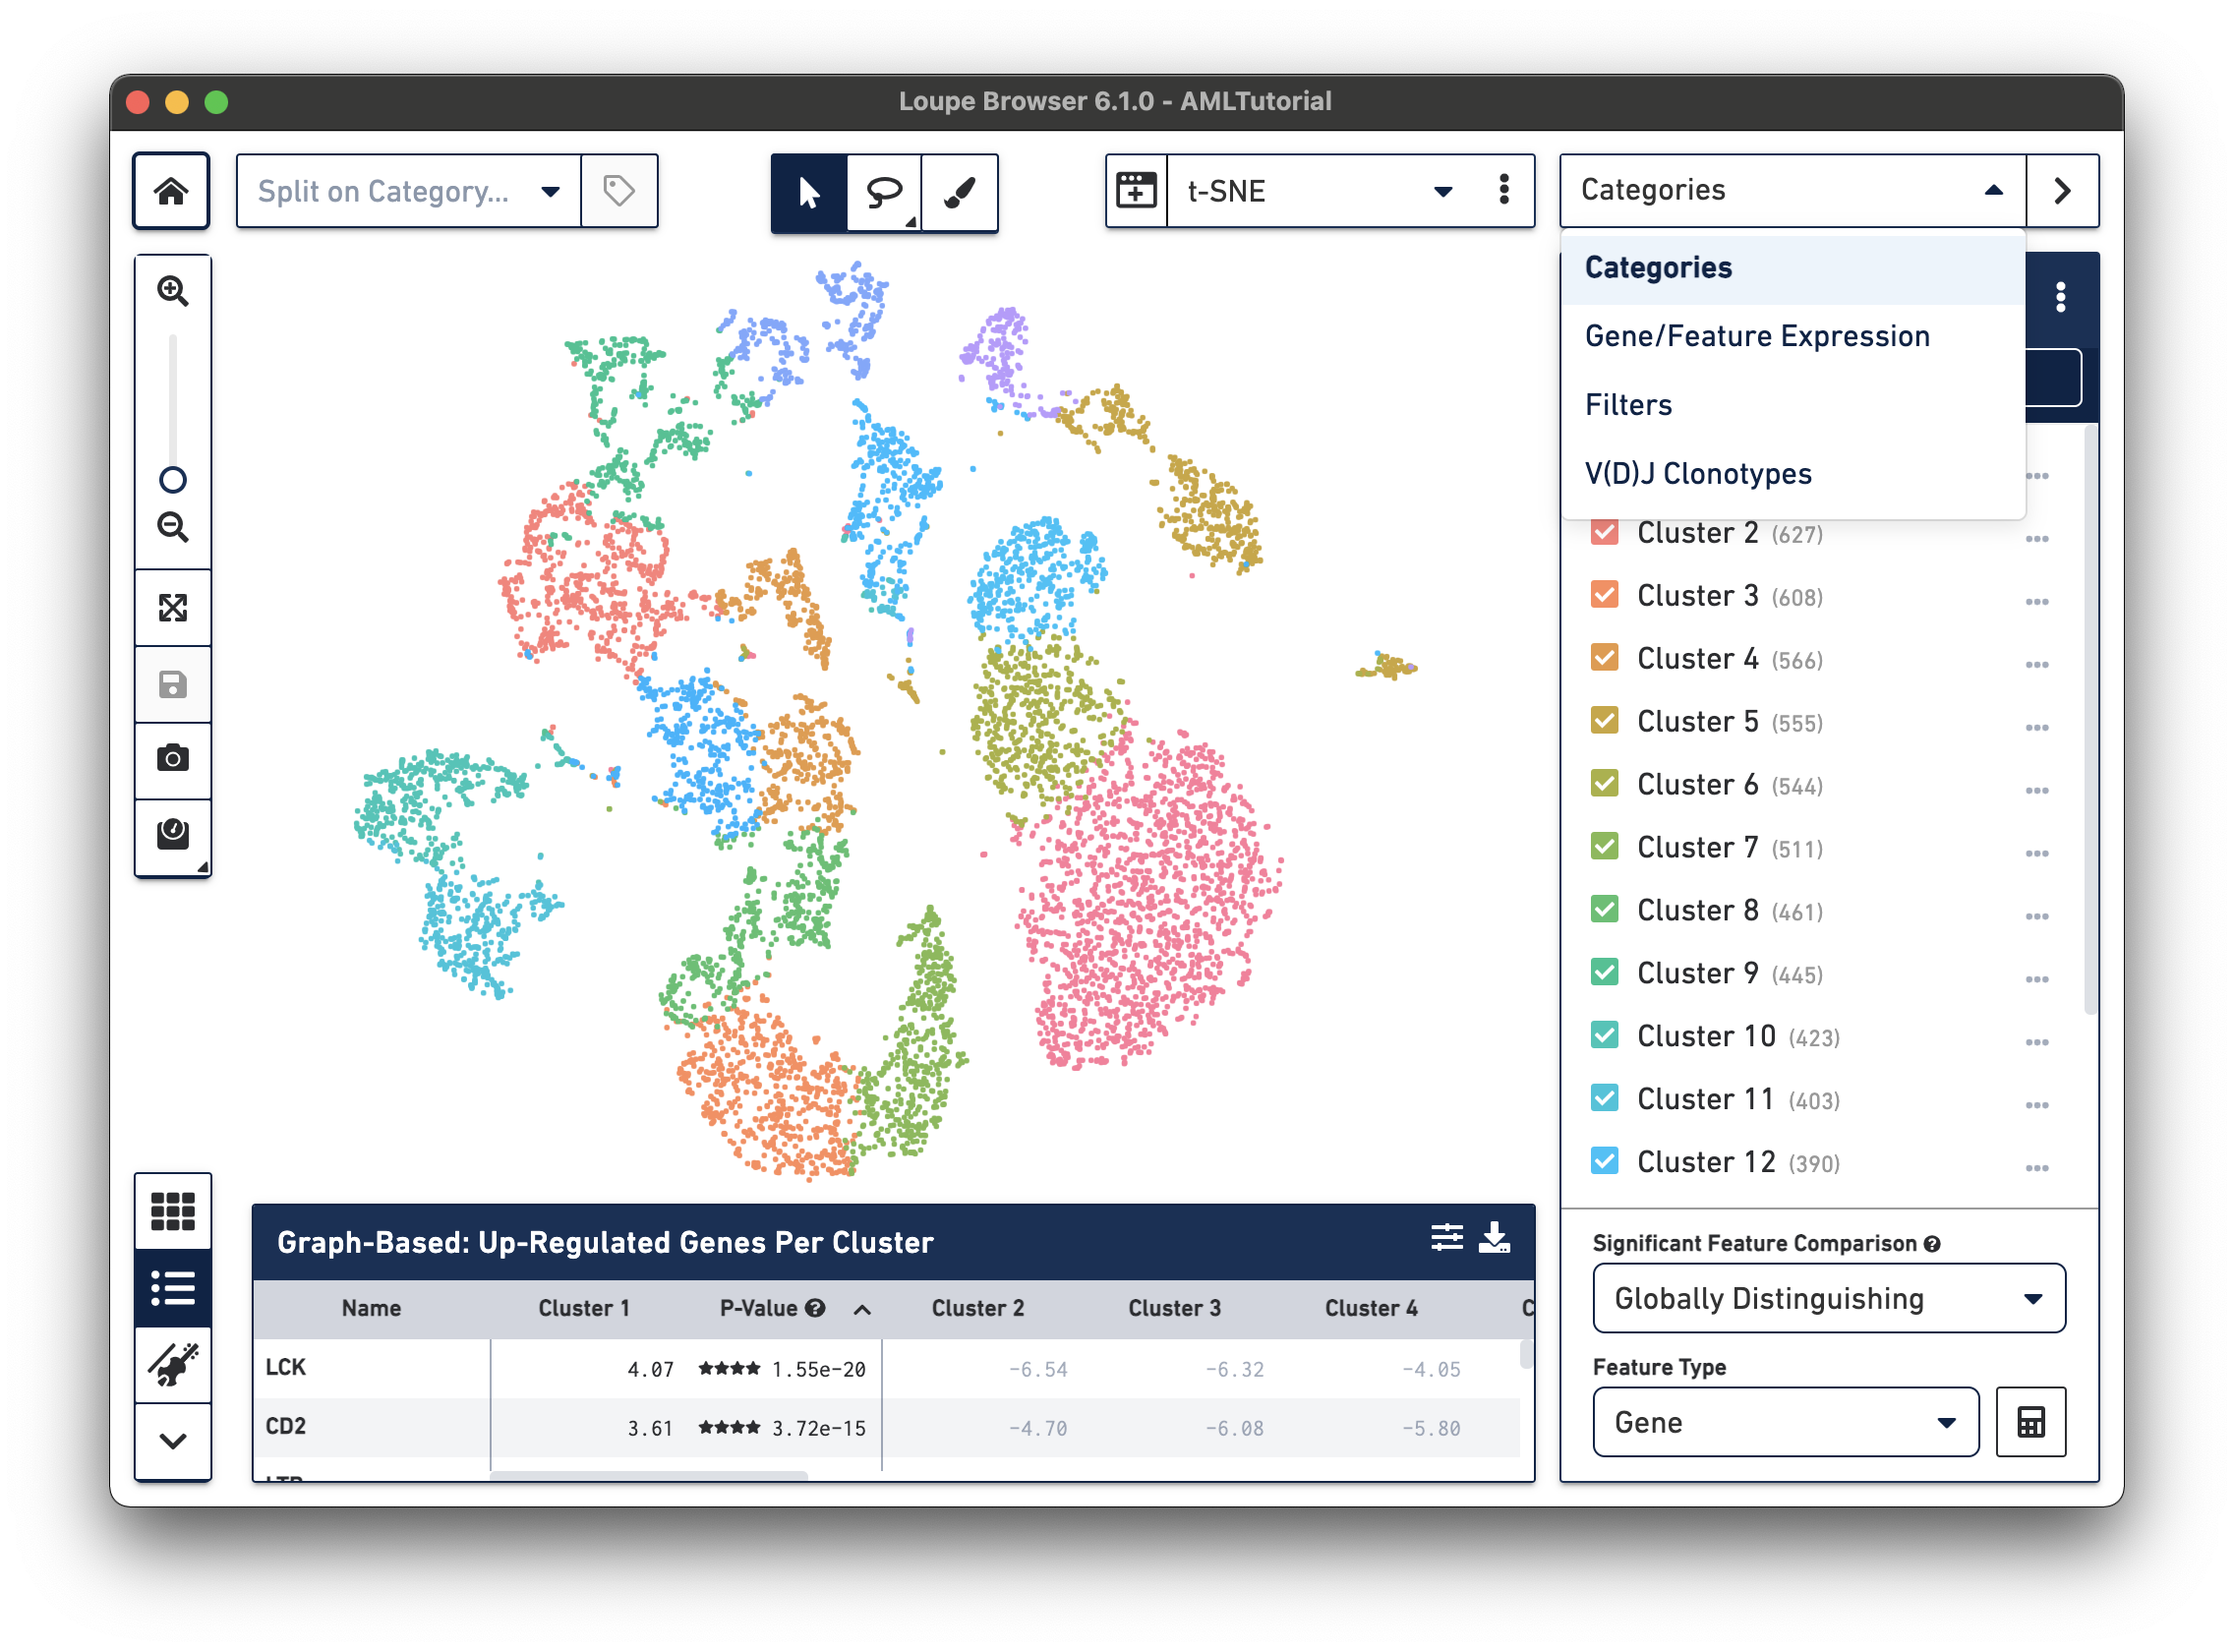
Categories mode provides three ways to display data clusters, including:
When you are in Categories mode, you can control the content in the Mode Panel by clicking on the three vertical dots next to the drop-down menu.
.cloupe file.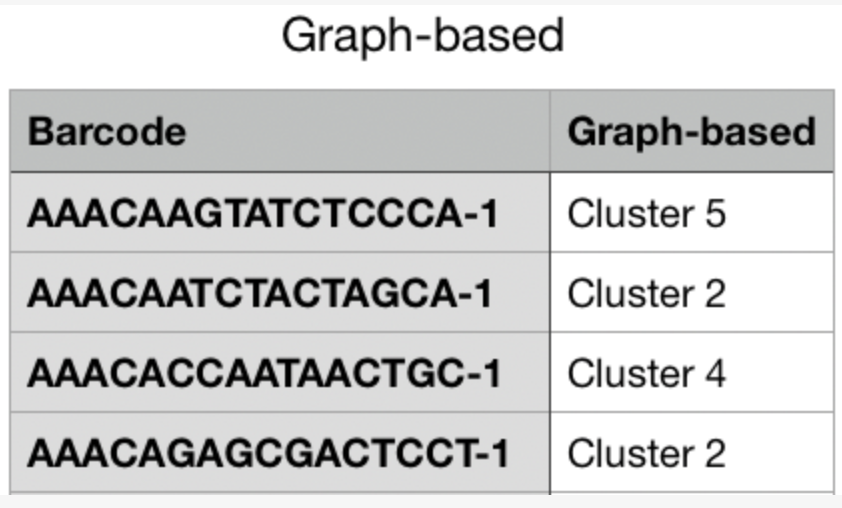
Use this drop-down menu to select which type of feature you want to use in the comparison. The options are Gene or a specific Feature Barcode type, such as Antibody or CRISPR.
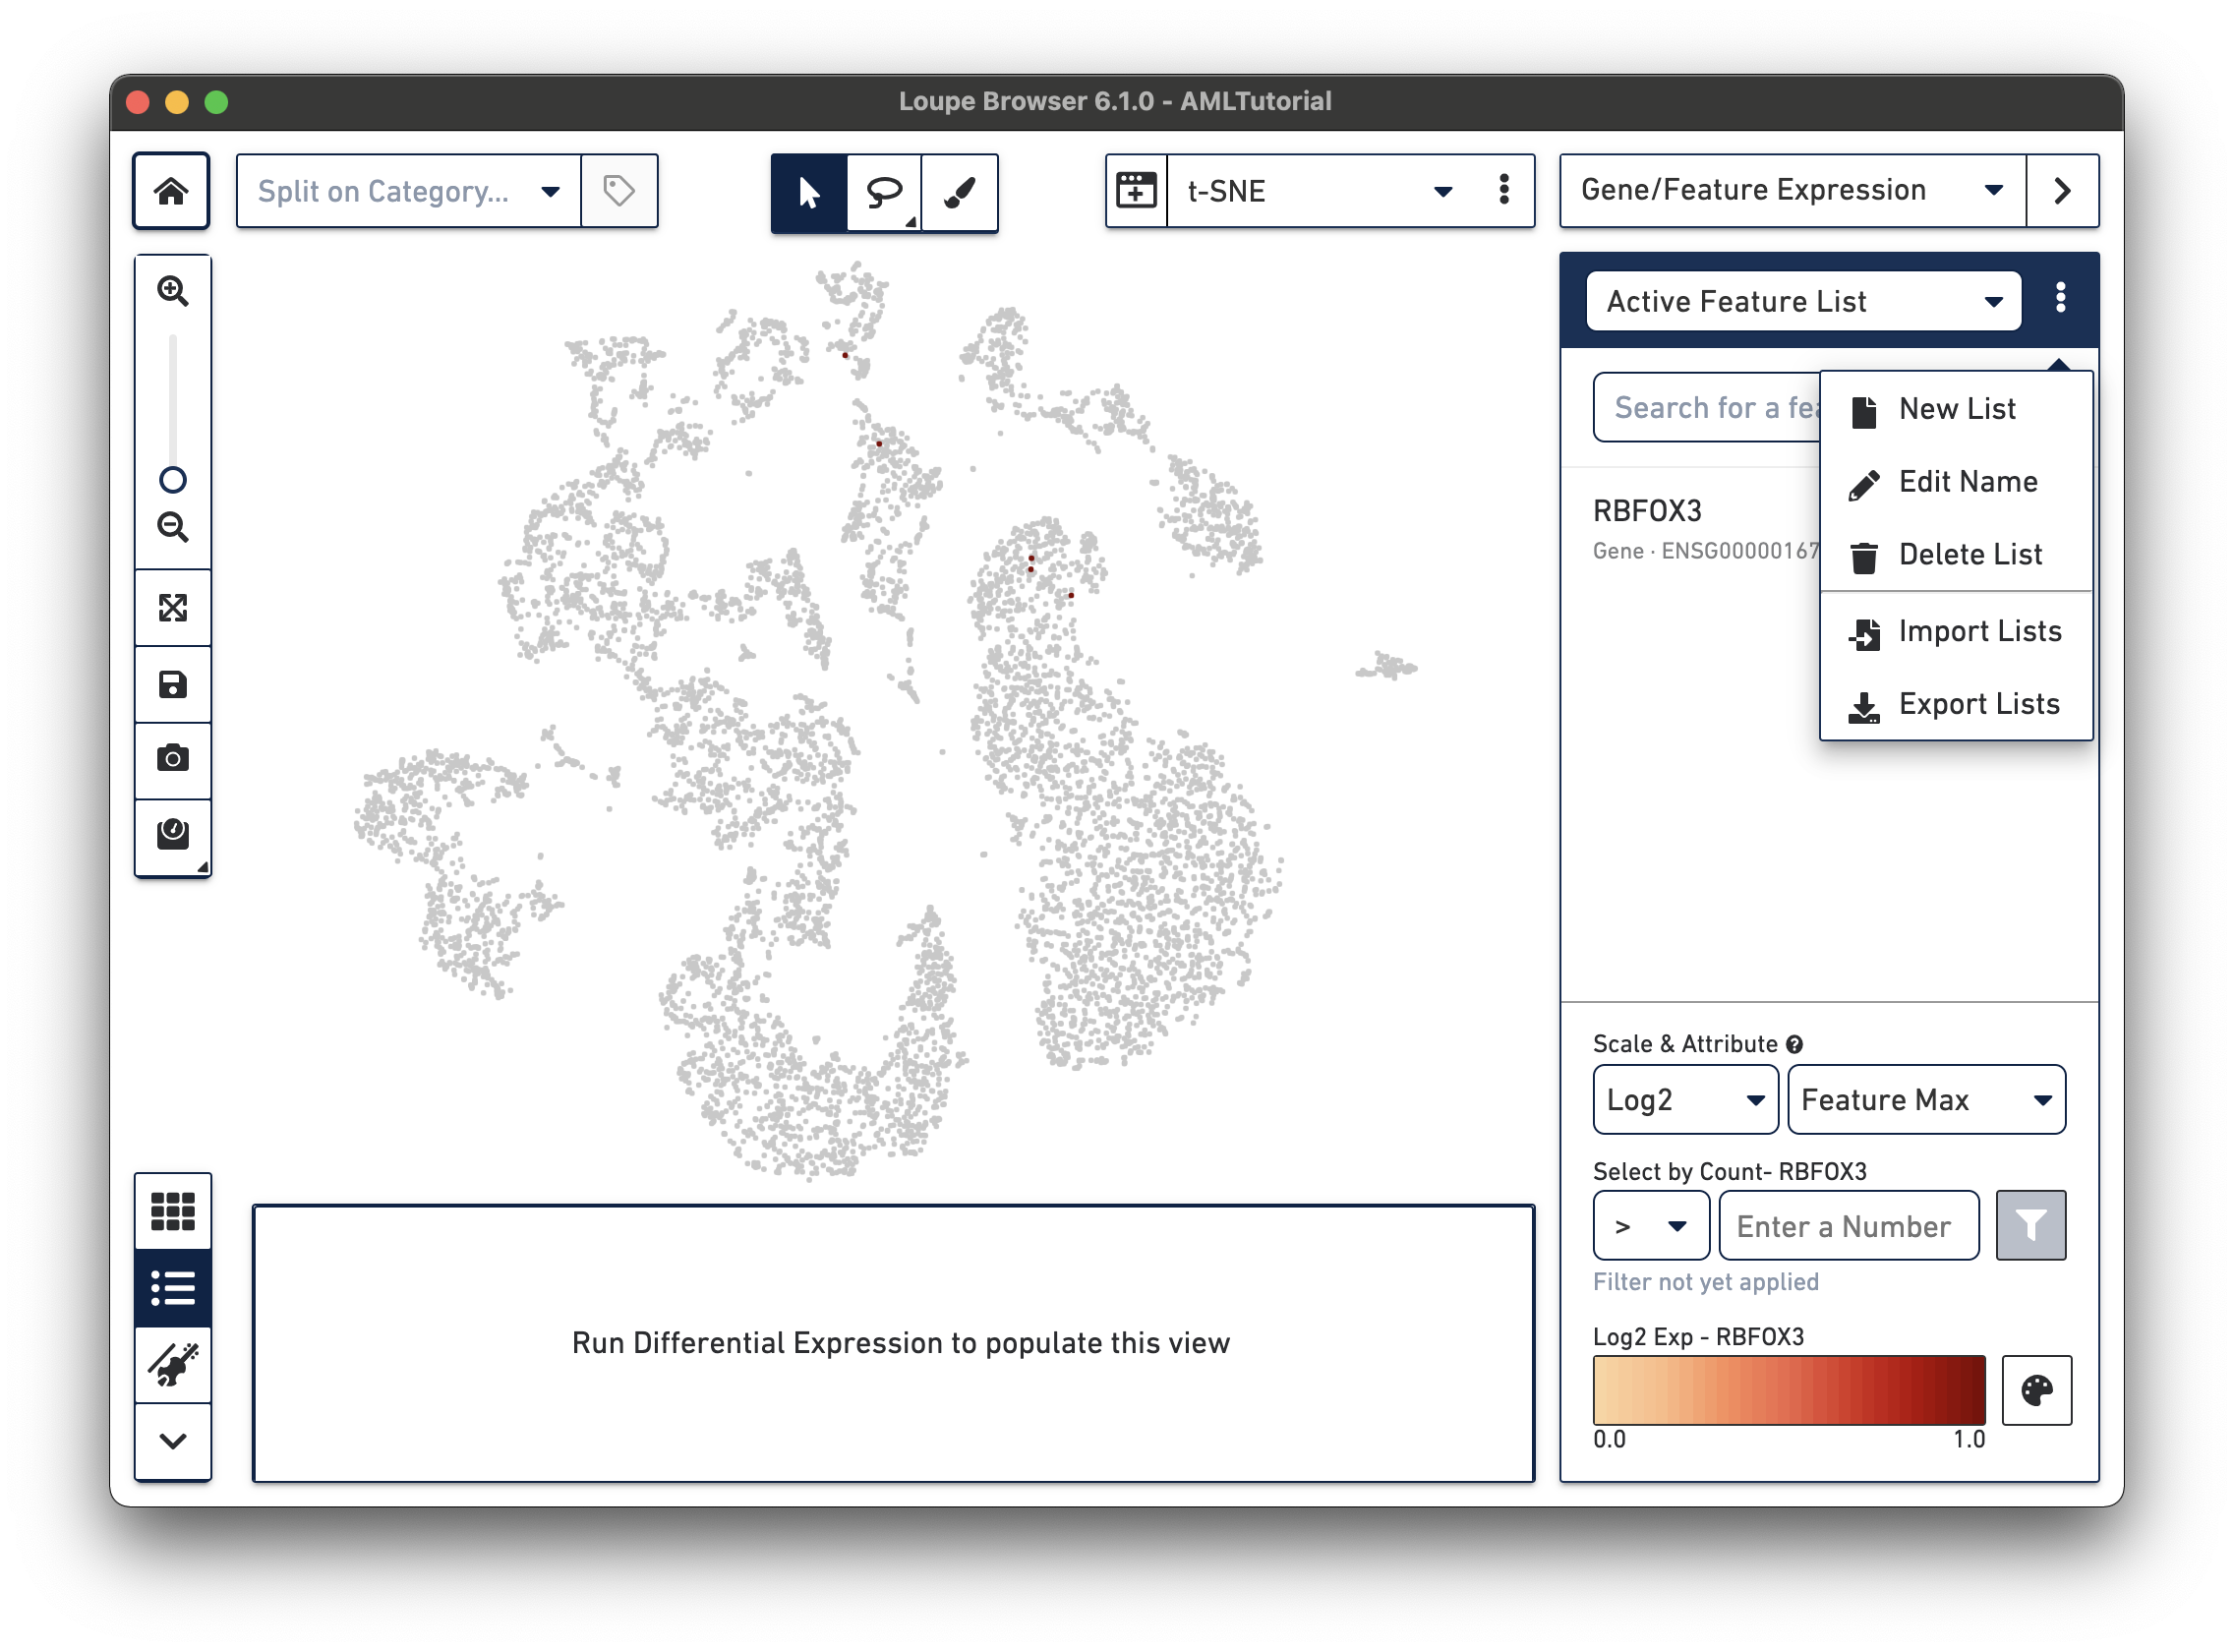
The Gene/Feature Expression mode provides a graphical representation of gene or feature expression across a dataset. One or more features can be viewed at a time. You can search for a feature of interest, or upload and save lists of features.
The Active Feature List contains a list of the features that you have either searched for, or uploaded. The expression patterns of those features are displayed in the View Panel. If more than one feature is in the Active Feature List, then the expression pattern corresponds to a combination of all the features. If only one feature is present or selected in the Active Feature List, then the expression pattern corresponds to that feature.
At the bottom of the Active Feature List there are a number of options that control how the data is visualized in the View Panel. The Scale & Attribute parameters control how the expression patterns are rendered in the View Panel.
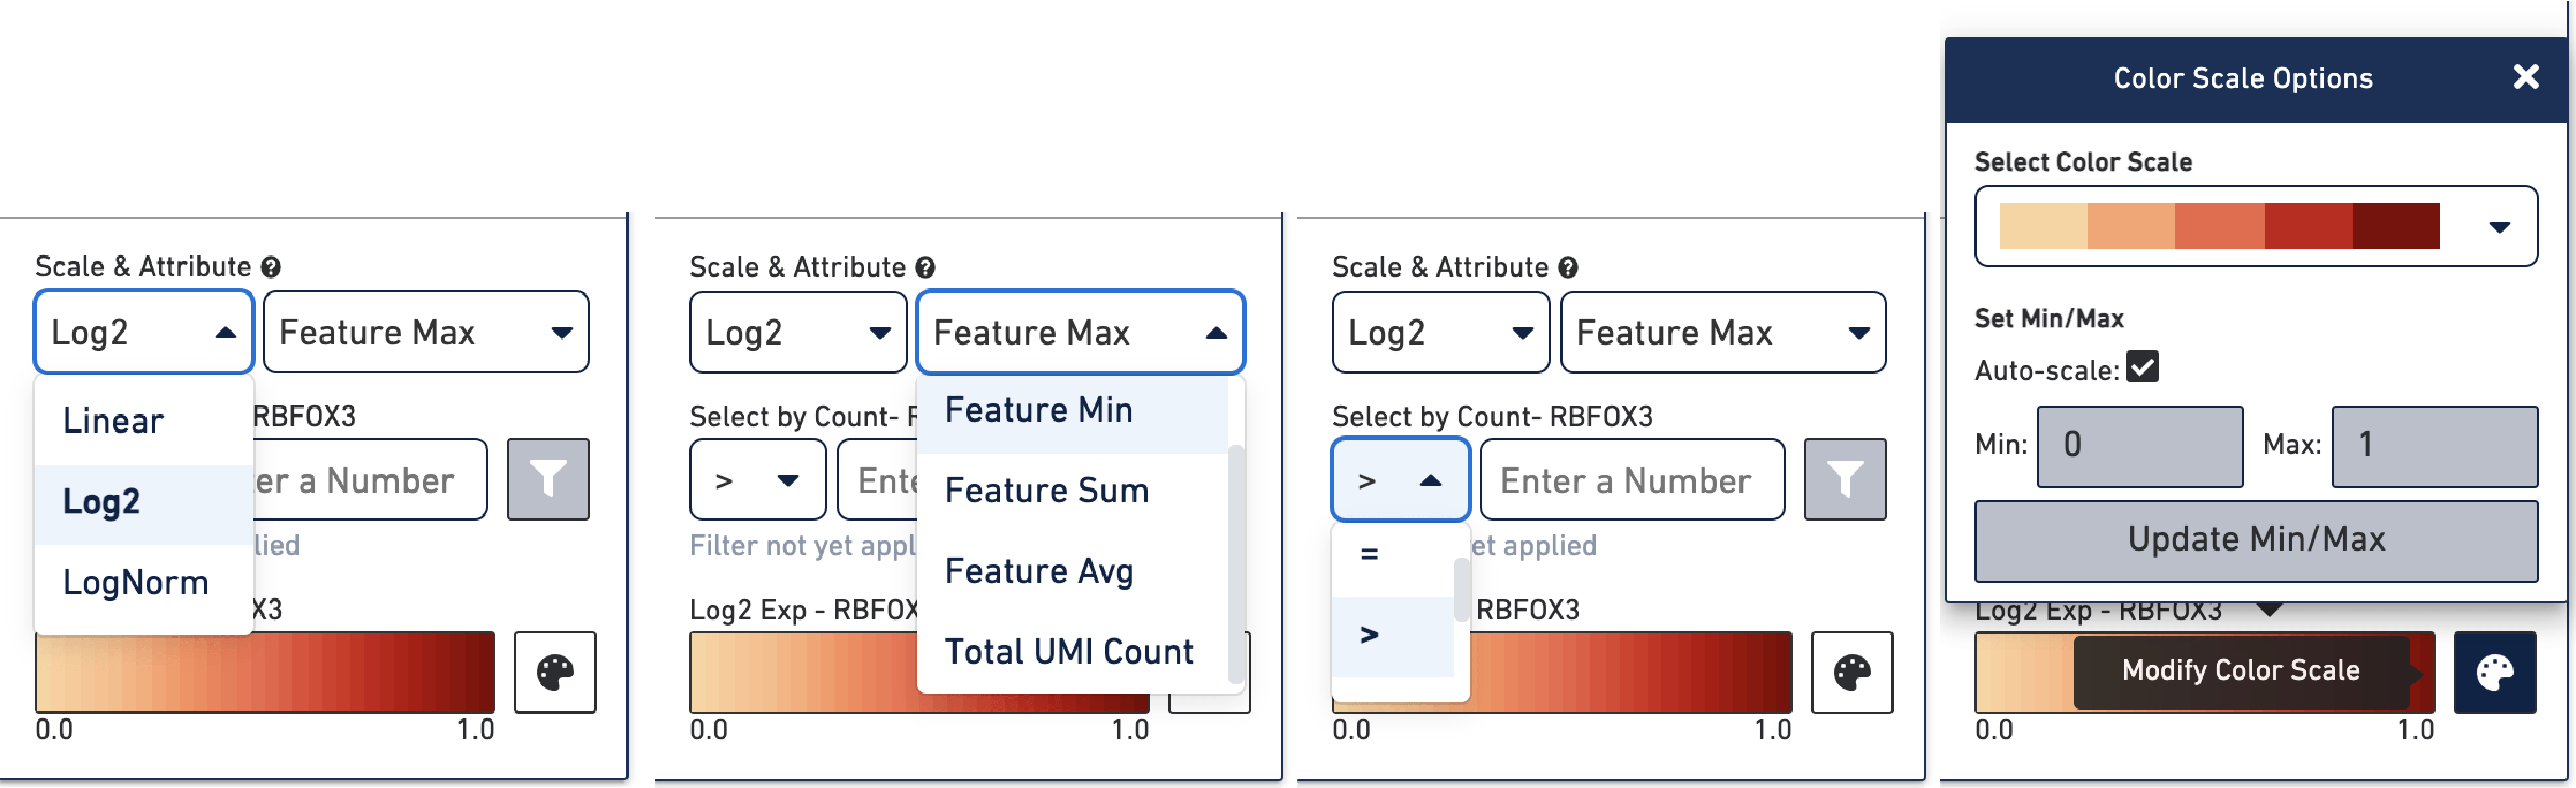
The Scale menu sets which scale value to display and has options: Linear, Log2, and LogNorm.
When Linear is chosen, actual UMI counts are rendered in the View Panel, without any normalization.
Log2 is the default setting and displays log2-transformed rendering of UMI counts in the View Panel.
Selecting LogNorm as the scale enables viewing of feature expression normalized by UMI count (for single cell and spatial datasets) or cut site count (for ATAC datasets). The log-normalization method is the same as methods used in Seurat and scanpy, with quantitative expression computed as follows:
LogNorm(feature,barcode)=ln(1000∗(feature_countbarcode_count)+1)
where the barcode count is the total number of UMIs or cut sites associated with the barcode. The relative expression ratio is multiplied by 10,000 in order to shift the relative expression distribution above the constant introduced by the log1p operation.
The Feature menu sets how to combine values when there are multiple features in the Active Feature List and has options:
| Loupe Browser 6.2 supports reclustering for GEX (Gene Expression) data in GEX + Antibody Capture, GEX + CRISPR Guide Capture, and GEX + ATAC datasets. For these datasets, the Gene/Feature Expression panel will separate the "Total UMI Count" option under the Scale & Attribute drop-down menu by library type, for example, "UMI Count - Gene Expression" and "UMI Count - Antibody Capture". |
The Select by Count controls how to filter the expression values displayed.
The color palette in the bottom right controls the color scale and range of values. You can also choose to manually set the min and max of the color scale by unchecking the Auto-scale checkbox, typing in a value, and clicking the Update Min/Max button. When setting manual min and max values, barcodes with values outside the range, less than the minimum or greater than the maximum, are colored gray. This is particularly useful if there is a lot of noise or ambient expression of a gene. Increasing the minimum value of the scale filters that noise. It is also useful to configure the scale to optimally highlight the expression of genes of interest.
In Gene/Feature Expression Mode, you can control the content in the Mode Panel under the Active Feature List by clicking on the three vertical dots next to the drop-down menu. This gives a number of options, as described below.
In Filters mode, you can compose complex boolean filters to find barcodes which fulfill your criteria. You can create rules based on feature counts or cluster membership and combine these rules using boolean operators. You can then save and load filters and use them across multiple datasets. For more details on using the Filters mode, see the identifying cell types tutorial built around single cell gene expression data.
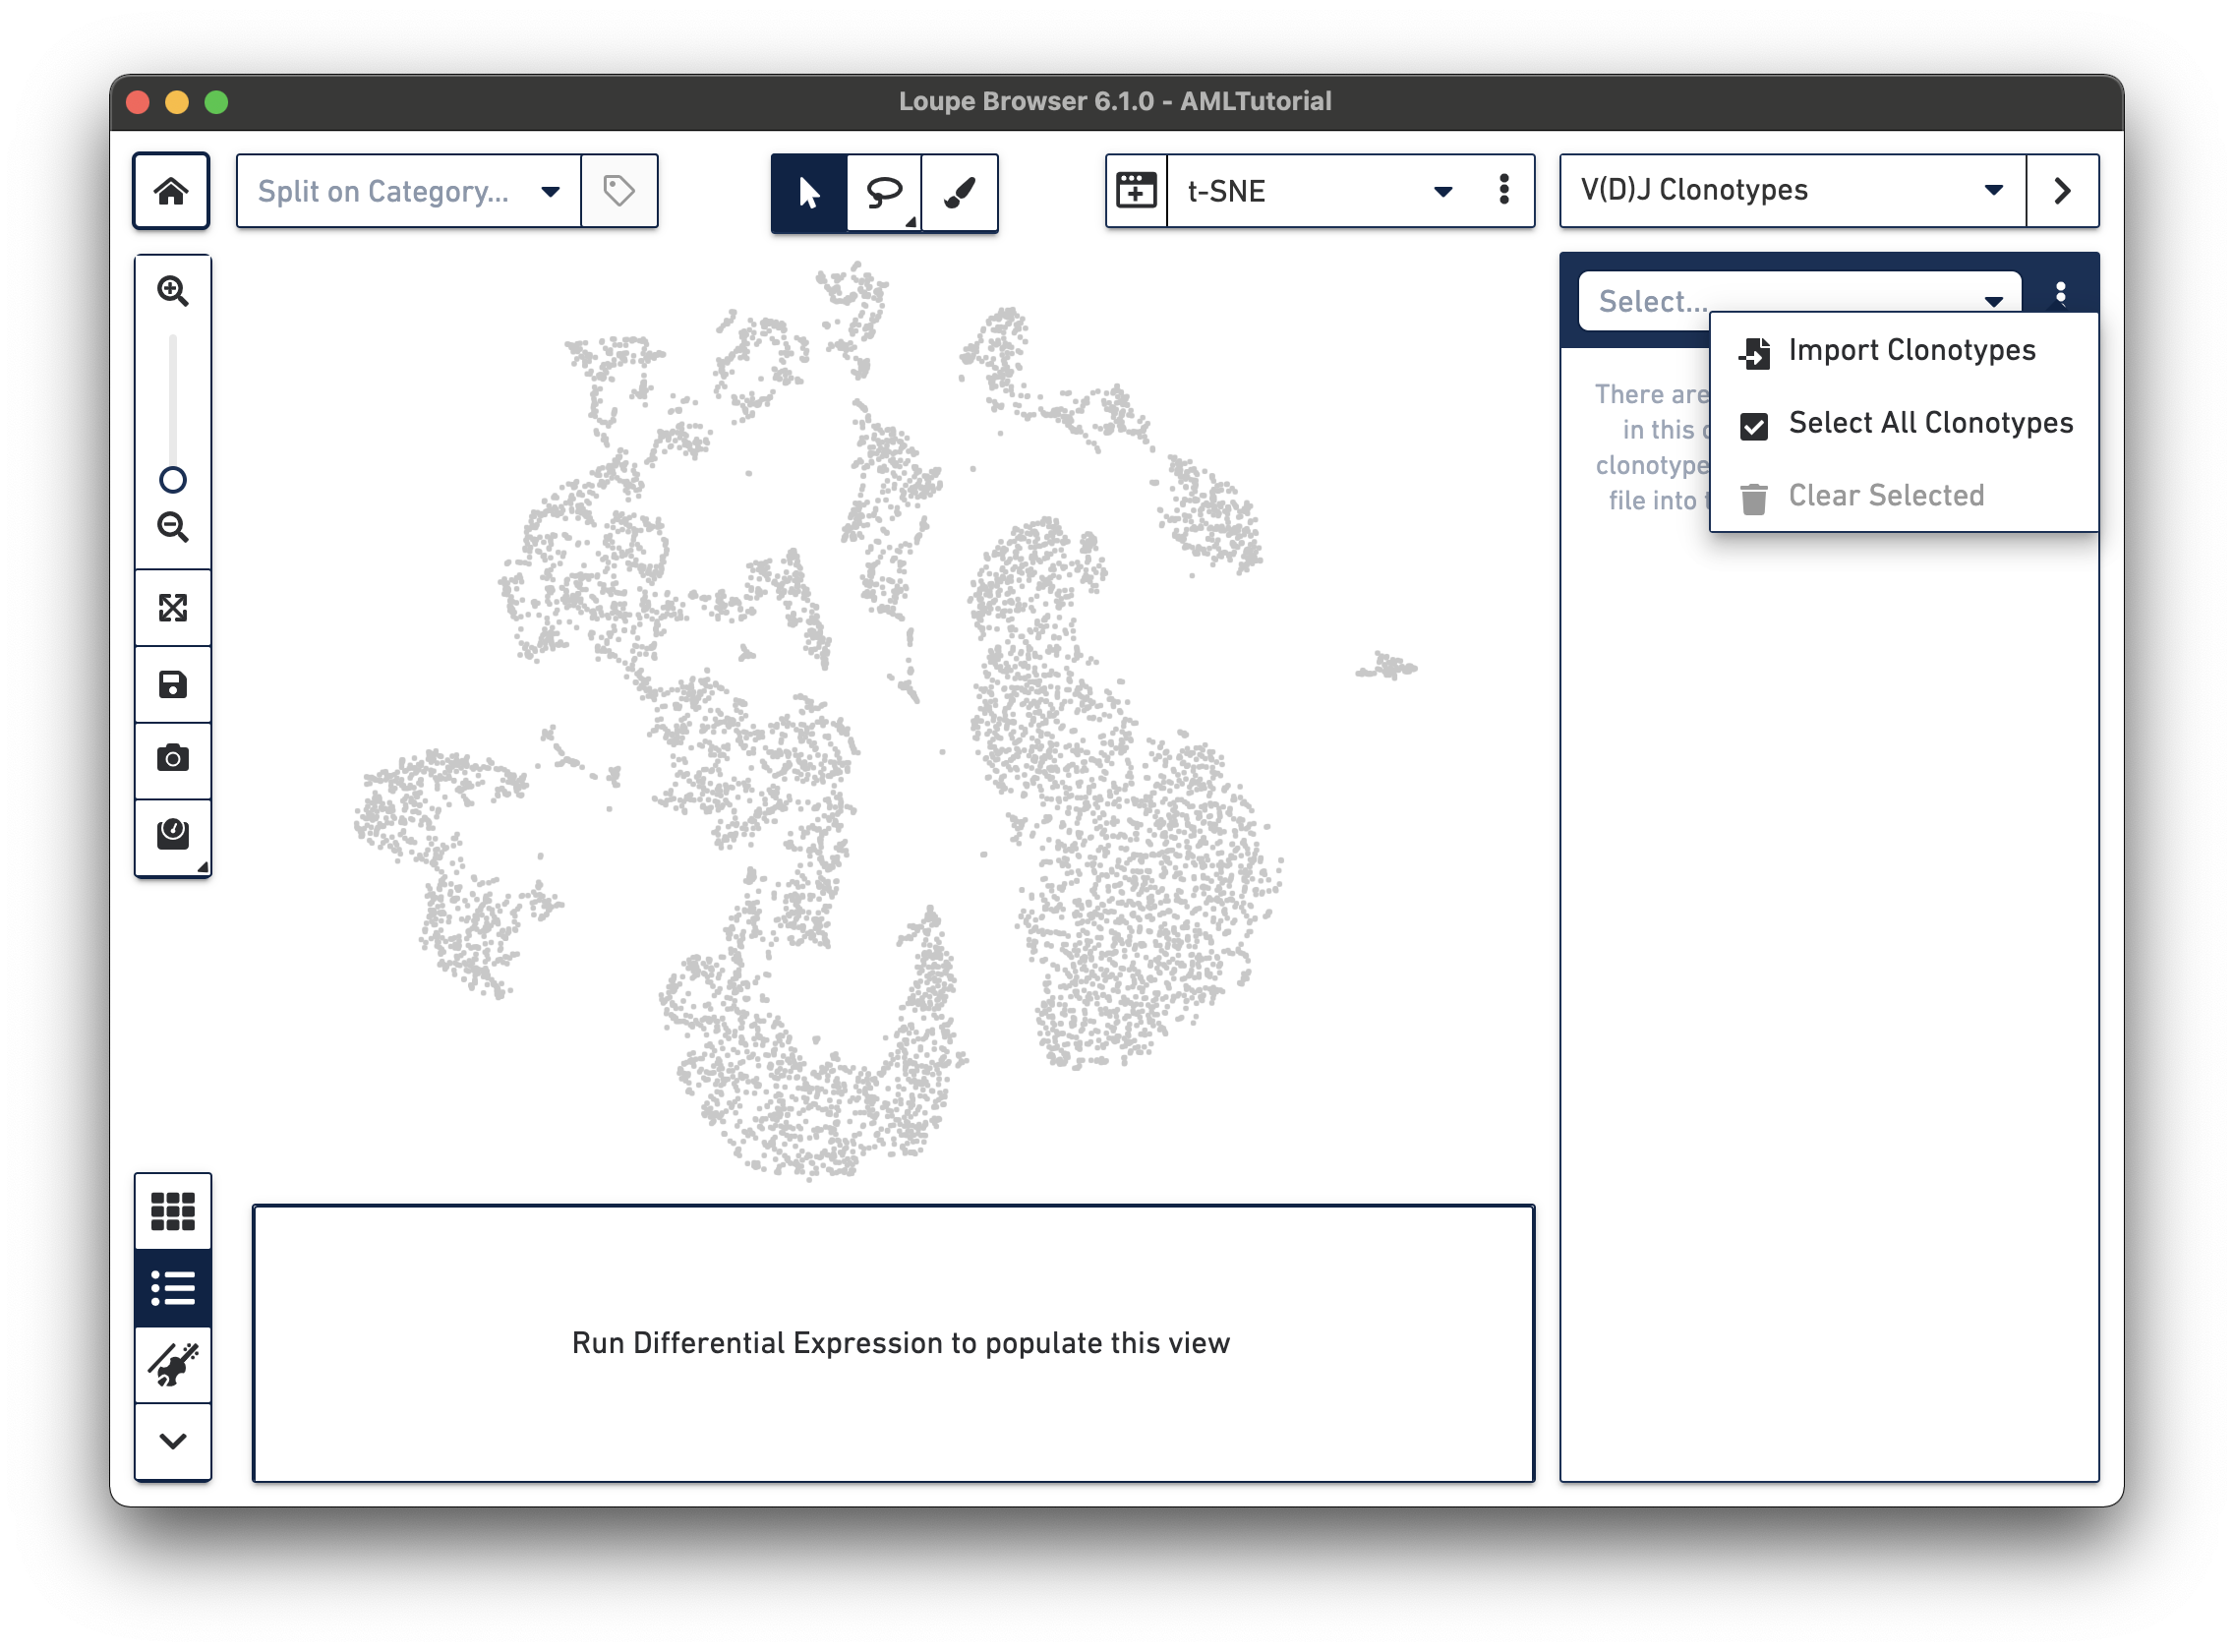
In V(D)J Clonotypes mode, you can load an input sample's corresponding V(D)J data into the Loupe Browser workspace. Cells that belong to the active set of V(D)J clonotypes are colored blue, and the sidebar changes to a filterable clonotype list. For more information on how to use Loupe Browser to combine gene expression and immune repertoire data, follow the Integrated Gene Expression and V(D)J Analysis in Loupe Browser tutorial.
The Data Panel on the bottom of the workspace displays information about the features driving differences between clusters. By default, it enumerates the genes that drive differences between the current precomputed clustering selected in the Categories sidebar. It also displays the results of a Significant Features analysis. The mini-toolbar to the left of the data panel switches between a table and a hierarchical heat map of differentiating features. Clicking on a feature name in the table view allows you to add that feature to a list for future reference, or to show counts of that feature across the dataset in the active projection.
Next, we will learn how to find significant genes.